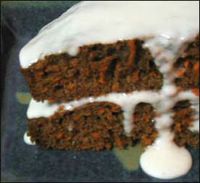
Monday, January 24, 2005

Carrot Cake

One of the only things keeping me from baking up a storm is that I need people to pawn my creations off on -- otherwise, Dan and I will consume an inordinate amount of food and end up on Maury Povich having to be airlifted out of our apartment. Several months ago, we were at Stew Leonards in Danbury shopping for ingredients to make dinner for my mom and we discovered their "half pies" -- basically, they package half a pie and charge you a little more than half the price of the full pie. While this challenges my frugalness, knowing that we'd only eat half a pie was a small price to pay for the markup.

This brings us to yesterday when I decide I'm going to make carrot cake. My initial thought was to make carrot cake cupcakes and freeze about half of them for later, but Dan complained that the texture of cupcakes is never the same as the whole cake, because the ratio of "crust" to interior is off. I agreed with him but still couldn't bear the thought of having an entire two-layer carrot cake lying around for us to pick at for the next week (or several days, depending upon how good it came out). Then it occured to me -- why not freeze one 8" cake and cut the other one in half and make half a two-layer cake? It's still 6 servings, but hopefully someone will come by in the next day or two to have some.

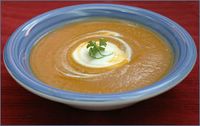
Since the constant inspiration for cooking is the vegetables we have around, carrot cake seemed like a natural choice. Carrots are good in stir-fries and we've recently remembered to cook some to go along with dinner, but we have not yet found a carrot based soup we liked and nearly every week we get another pound of carrots, so they quickly accummulate. I had seen a recipe on Cookinglight.com which used apple butter (it's easy to make in your slow cooker) and another in Bonnie Stern's cookbook and decided to marry the two in what turned out to be not only a moist and delicious carrot cake, but fairly healthy too.

Carrot Cake
adapted from Cooking Light and Bonnie Stern's Heart Smart Cooking for Family and Friends

Ingredients:
1 C all-purpose flour
1 C whole wheat flour
1/2 C sugar
1/2 C light brown sugar
2 t baking soda
2 t ground cinnamon
1 t salt
1/2 C apple butter
1/2 C vegetable oil
1 T vanilla
2 large eggs
2 large egg whites
3 cups shredded carrot, about a pound (using the food processor makes this easy, though a box grater will work as well)
cooking spray
1/4 C sour cream
1 C confectioners sugar
1/4 t vanilla
1/4 t lemon juice

Directions:
1. Preheat oven to 350. Combine flours, sugars, baking soda, cinnamon and salt in a bowl and mix with a whisk.
2. In a separate bowl, combine apple butter, vegetable oil, vanilla, eggs, and egg whites.
3. Create a well in the middle of the dry ingredients and add the wet ingredients, mixing just until combined. Fold in shredded carrots.
4. Spray two 8" round pans with cooking spray and split batter evenly between pans. Bake for 30 minutes -- a toothpick inserted in the cake should come out clean or with a few crumbs.
5. Cool the cakes on a wire rack for about 10 minutes before removing from the pans and cooling completely on the rack.
6. To make the frosting (which is really more of a glaze) combine the sour cream, vanilla and lemon juice. Add in the sugar, whisking well. It will be a bit runny, but it sets up nicely on the cake if you apply a thin layer.

Personally, I cut one 8" cake in half and stacked the two layers. (I cheated, using a toothpick between the layers to ensure they didn't slide off.) I wrapped the other cake in Saran Wrap and then foil, and placed in a plastic bag in my freezer for another day.

Tuesday, January 18, 2005

Another Urban Organic Inspiration

I've mentioned before that we get a weekly delivery from Urban Organic. I love it, because it forces us to eat lots of vegetables and fruits and it is often an impetuous to explore new ingredients and recipes. I never bought swiss chard or collard greens before we started getting delivery, but now I love them both and prepare them often.

During the winter months, I often get a variety of winter squash and love to make soup with it. Since reviving this blog, I've been pouring through my extensive collection of cookbooks for inspiration. Several Christmases ago I got The Chez Piggy Cookbook from my mother-in-law. Chez Piggy is a restaurant in Kingston, Ontario; while I'm still trying to discover exactly what is meant by "Canadian Cuisine," I'm happy to try recipes from celebrated Canadian restaurants. My hubby (who is responsible for taking the picture above) says I should mention that Chez Piggy was opened by Zal Yanovsky of The Loving Spoonful -- known for "Do You Believe in Magic" and "Summer in the City." (If only I was audio-inclined I could include sound clips of Dan's helpful impersonations.) This one particularly appealed to the former pyromaniac Girl Scout in me, as it includes the always fun task of burning off the alcohol from brandy before incorporating it into the soup. Oh yes, and as it turns out, the soup is quite tasty -- and even quite healthy (unless you go the cream and butter route, of course.)

Gingered Squash Soup
adapted from Chez Piggy Cookbook
1.5 cups with a dollop of fat-free plain yogurt = 3 WW points (flex plan)

Ingredients:
8 C vegetable stock (you can use chicken if you prefer)
6 C butternut squash, chopped, peeled (or any winter squash)
1 onion, roughly chopped
1 carrot, chopped
4 cloves of garlic, peeled
2 inch piece of ginger, peeled
2 t ground cardamon
2 t ground coriander
3 T honey
1/4 C brandy
1/2 C plain yogurt
salt & pepper to taste
1 sweet potato, peeled and chopped

Directions:
1. Bring stock to a boil in a large pot while you prepare the veggies.
2. Reduce heat to a simmer and add chopped vegetables, ginger, cardamon and coriander. Cook until vegetables are soft -- about 25-35 minutes.
3. Stir in honey. Dealcoholize the brandy by placing it in a metal ladle and lighting it on fire. It will take about three to five minutes for all the alcohol to burn off. Add brandy to soup and cook for about ten more minutes.
4. Using an immersion blender(or food processor), puree the soup and add the yogurt to the soup. Season with salt and pepper to taste.

If you want a richer soup, you can substitute cream for the yogurt and add a T of butter to the final soup. Toasted slivered almonds would also make a lovely garnish.

Friday, January 14, 2005

Matzo Ball Soup

After making a roast chicken last Friday, I whipped up a batch of chicken soup with the left over carcass. Lately, I've been making tons of vegetable broth with all the leftover bits of veggies I have from various cooking projects, so having homemade chicken soup was a bit of a treat and I wanted to use it wisely. I suppose if I was raised by a nice Jewish mother, I would have a family recipe for Matzo ball soup from which I would be unwilling to stray, but since my family is not Jewish (despite my parents both coming from Long Island and having the last name "Klein") I was on my own as far as coming up with a recipe.

I first discovered how much I liked Matzo Ball soup back in college when I worked at Rein's Deli in Vernon, CT. While Rein's can't compare to New York City institutions like Katz's, in the culinary wasteland that is Northeastern Connecticut, it is a gem.

I poked around through quite a few recipes, including my tried and true, well-stained copy of Joy of Cooking, but when I realized how unhealthy it was going to be, I had second thoughts. This brought me to purusing through HeartSmart Cooking For Family and Friends by Bonnie Stern. I was first introduced to this book by my husband, who made us her delicious Cilantro Chicken (a recipe I will have to share soon). She seems to have a knack for healthy recipes that are delicious and doesn't use any processed or weird "low-fat" ingredients, so I figured her book was worthy of some further exploration. This delicious Matzo Ball soup is just 2 pts per serving (with 3 Matzo balls!) and while it may not be just like your mom's, it was just what I wanted.

Matzo Ball Soup
adapted from HeartSmart Cooking for Family and Friends by Bonnie Stern
makes 4 servings (1.5 cups of broth and 3 matzo balls), 2 WW Flex Points

Ingredients:
1 egg
2 egg whites
1/2 C matzo meal
1 1/2 t salt
2 T chicken soup
2 T chopped parsley
6 C homemade chicken broth or high quality canned

Directions:
1. Beat eggs and egg whites together in a bowl. Mix in matzo meal, salt, chicken soup and parsley. Refrigerate mixture for at least 30 minutes.
2. Bring a large pot of salted water to a boil. Meanwhile, form matzo mixture into 12 small balls, about 1" each.
3. Add matzo balls to boiling water one by one, trying not to crowd the pan. Simmer the matzo balls for about 40 minutes.
4. When the matzo balls are done, remove them from the boiling water (they will have doubled in size) and add to pot of chicken broth. Bring broth up to desired temperature and serve.
If you prefer to make the matzo balls in advance, just store the drained balls in chicken broth until ready to heat and serve.

Wednesday, January 05, 2005

Stir Fry with Zing from Chinese Cooking for Dummies

A couple of Christmases ago, I was insulted by this gift until I found out that Chinese Cooking for Dummies was among the better Chinese cookbooks out there (thanks to my hubby who had researched and suggested to my father-in-law it would be a good choice).

One of the best things about living in New York City is that even the most obscure ingredients are obtainable, which means most of the recipes in this cookbook are just a trip to Chinatown away from my possession. While there are many smaller shops with more personality, I'm a fan of Kam Man Food Products (200 Canal, near Mott Street). They have huge jars displaying everything from dried mushrooms and teas to shark fin and birds nests. Prices on everything from soy sauce to nori are amazing, making it well worth fighting the throngs of tourists who are forever clogging up Canal Street. (I shouldn't complain about tourists.) One of my favorite recipes from the Chinese Cooking for Dummies is for Hot and Spicy Stir-Fry Sauce. I must warn you though -- you'll never enjoy bottled stir-fry sauce again, but this is easy to make and yields enough for several stir-fries.

Hot and Spicy Stir-Fry Sauce
adapted from Chinese Cooking for Dummies

Ingredients:

2/3 C Chinese rice wine
1/3 C soy sauce
1/3 C chicken broth
3 T sugar
1/2 t white pepper
2 T scallions, thinly sliced
1 1/2 T chile garlic sauce
2 T vegetable oil
1 1/2 T garlic, minced
1 1/2 T ginger, minced
2 T cornstarch, dissolved in 1/4 C water

Directions:

1. Combine rice wine through chile garlic sauce in a small bowl.
2. Heat oil over high heat in a sauce pan. Add ginger and garlic, stir frequently while cooking until fragrant.
3. Add rice wine mixture to pan and bring to a boil. Reduce heat to medium and cook for a couple of minutes. Add cornstarch and cook until sauce boils and becomes thick. Cool.

Adjust the amount of chile garlic sauce, depending on how spicy you like your stir-fry -- with the 1 1/2 tablespoons, it packs quite a punch. This mixture keeps well in the fridge for quite a while -- at least a month or so (I've never managed to keep it around that long, it's so delicious).

My stir-fries never seem to follow a recipe very closely -- it just depends on what I've received from Urban Organic that week. Last night's stir-fry featured carrots, broccoli, onions, water chestnuts(just .55 a can at Kam Man!), scallions and chicken. I highly recommend marinating whatever protein you're featuring (I always chop the meat into strips before marinating) in the sauce while you chop the veggies for the stir-fry. I've also learned that my stir-fry is vastly improved when I cook the protein(tofu, meat or shrimp) with the sauce first and stir-fry the veggies separately, adding the sauce and meat into the veggies at the end. This ensures that the meat is cooked properly, without overcooking the veggies.

Tuesday, January 04, 2005

Lentil Soup Worth Eating

The truth is I don't much care for beans. I *want* to like them, but for some reason, their appeal evades me. There are some exceptions, like homemade hummus (as long as you leave out the tahini), but for the most part, I avoid them. However, there has been a force battling me on the bean-liking, namely the frugal, "completion-obsessed" Heather who knows there has been a container of Lentils du Puy (French green lentils) on the shelf for a while and wants to use them up, even if she never buys them again.

I'm also into slow cooker recipes lately -- while I know I'm home working all the time, that doesn't mean I can spend all day in the kitchen (though I might want to) -- warm, easily prepared food seem to be exactly what I'm craving.

Last week, I made this lentil soup; no surprise, it's based on a Cooks Illustrated recipe that I adapted for the slow cooker. The soup is rich and delicious, and the lentils hold their shape (except those pureed by my handy immersion blender). I anticipated trying it, remembering how much I hate legumes and making my husband finish it off, but I think he'll just have to share the rest with me.

Lentil Soup
adapted from Cooks Illustrated

Ingredients:
3 slices of bacon, cut into small pieces
1 large onion chopped fine
2 medium carrots peeled and chopped
3 medium cloves of garlic, minced
1 14.5 oz can diced tomatoes, drained
1 bay leaf
1/2 t dried thyme
1 C lentils, rinsed and picked over
1 t salt
ground black pepper
1/2 C dry white wine
4 1/2 C vegetable broth
1 1/2 C water
1 1/2 t balsamic vinegar
3 T minced fresh parsley

Directions:
1. Fry bacon over medium heat until crisp. Add onions and carrots to bacon fat and cook until they begin to soften. Add garlic and cook about 30 seconds, then add the tomatoes, bay leaf and thyme and cook briefly.
2. Put onion mixture, lentils, salt and pepper into slow cooker and cook on low for about an hour.
3. Increase heat on slow cooker to high and add wine, with lid slightly ajar (30 minutes or so, depending on your cooker).
4. Once the mixture has come to a simmer, add broth and water and return to a simmer, with lid still slightly ajar.
5. Reduce heat to low and cook for about 6 hours, or until lentils are tender.
6. Remove bay leaf, and use an immersion blender to blend some, but not all of the soup to the desired consistancy.
7. Add vinegar and allow to cook on high for about 30 minutes.
8. Stir in parsley and serve.

This soup freezes well -- I always save the quart sized Chinese soup containers for this very purpose. If you decide to freeze the soup, add the vinegar when you reheat the soup.

For anyone who cares, there are 3 Weight Watchers points per 1 cup serving.